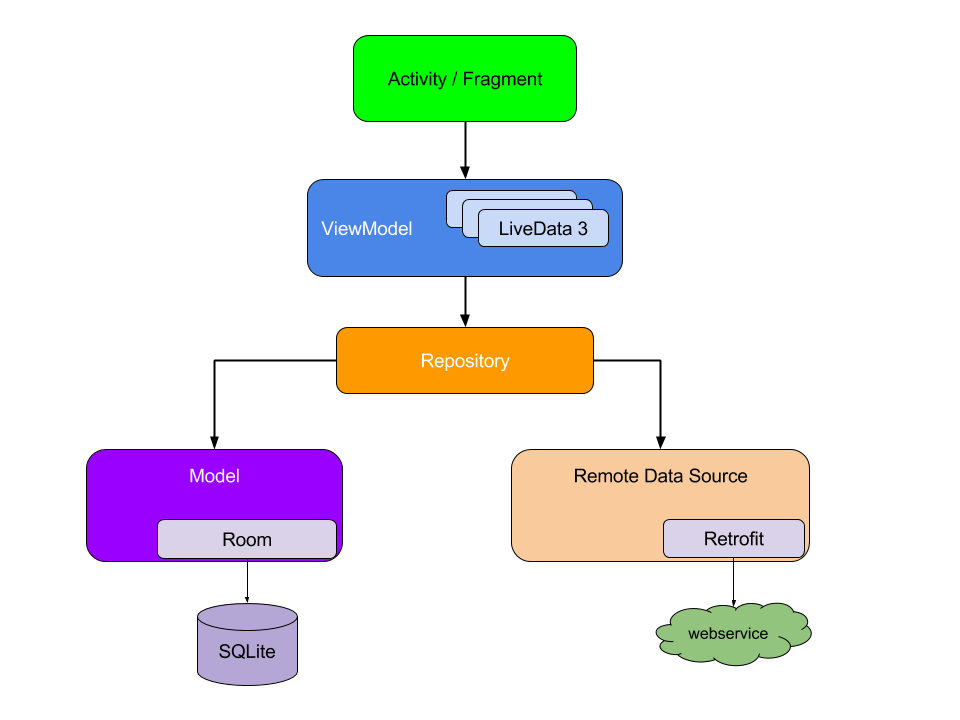
Android Jetpack是google推出的帮助开发者快速开发应用的一整套组件的集合。官方文档地址:Jetpack。有一些新的概念,对开发还是很有用的,这里记录一下:
ViewModel
概念
官方定义:
The
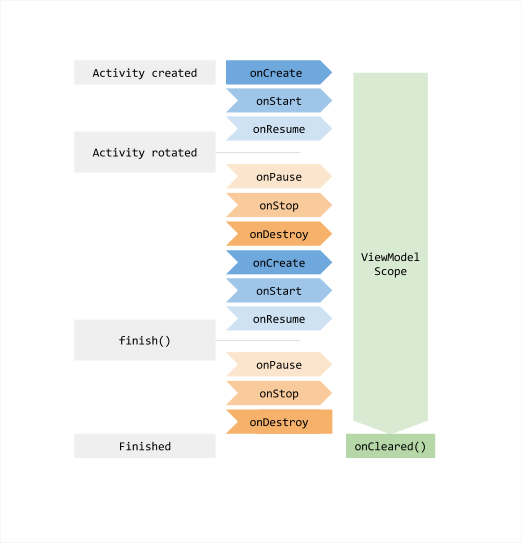
ViewModelclass is designed to store and manage UI-related data in a lifecycle conscious way. TheViewModelclass allows data to survive configuration changes such as screen rotations.当你的页面因为某些原因被destory and recreate的时候,ViewModel的实例却能依旧保存,不需要重新拉取数据。ViewModel的生命周期与Activity的生命周期相同,如下图:
![ViewModel的生命周期]()
Caution: A
ViewModelmust never reference a view,Lifecycle, or any class that may hold a reference to the activity context.代码
创建一个Model类, 继承自ViewModel
1
2
3
class DemoViewModel: ViewModel() {
    //...
}
在Activity中获取ViewModel
1
2
3
4
5
6
class DemoActivity: AppCompatActivity() {
    override fun onCreate(savedInstanceState: Bundle?) {
        super.onCreate(savedInstanceState)
        ViewModelProviders.of(this).get(DemoViewModel::class.java)
    }
}
如何使用
1
2
3
4
5
6
7
8
def lifecycle_version = "1.1.1"
//ViewModel && LiveData
implementation "android.arch.lifecycle:extensions:$lifecycle_version"
//LifeCycler
implementation "android.arch.lifecycle:runtime:$lifecycle_version"
annotationProcessor "android.arch.lifecycle:compiler:$lifecycle_version"
//if using Java8, use the following instead of compiler
//implementation "android.arch.lifecycle:common-java8:$lifecycle_version"
在kotlin中使用:
a. 将annotationProcessor更换成kapt
b. 引入插件 ‘ kotlin-kapt ’
1
2
3
4
5
apply plugin: 'kotlin-kapt'
...
kapt {
    generateStubs = true
}
LiveData
概念
官方定义:
LiveDatais an observable data holder class. Unlike a regular observable, LiveData is lifecycle-aware, meaning it respects the lifecycle of other app components, such as activities, fragments, or services. This awareness ensures LiveData only updates app component observers that are in an active lifecycle state.LiveData 是lifecycle-aware的, 设置一个被观察对象(继承了LifecycleOwner 接口)之后,当LiveData数据返回变化之后,会自动触发onChange方法。特殊的是,只有当被观察对象出入active状态时(STARTED or RESUMED)。
代码
LiveData 一般与 ViewModel 一起使用
1
2
3
4
5
6
7
8
9
10
11
12
class DemoViewModel: ViewModel() {

    private var mCurrentName: MutableLiveData<String>? = null

    fun getCurrentName(): MutableLiveData<String> {
        if (mCurrentName == null) {
            mCurrentName = MutableLiveData()
        }
        return mCurrentName!!
    }

}
Activity 获取LiveData 并设置被观察对象
1
2
3
4
5
6
7
8
9
10
11
class DemoActivity: AppCompatActivity() {

    override fun onCreate(savedInstanceState: Bundle?) {
        super.onCreate(savedInstanceState)
        ViewModelProviders.of(this).get(DemoViewModel::class.java).apply {
            getCurrentName().observe(this@DemoActivity, Observer { item ->
                //...
            })
        }
    }
}
绑定了被观察者之后,并不需要手动去解绑,因为LiveData是生命感知的,所以在lifecycle destory的时候,会自动解除绑定。
只有处于active状态时,才会有通知回调。当数据更新了,但处于非active状态下,更新的数据会等到被观察者重新回到active状态时通知回调。
更新LiveData的数据
1
2
3
4
5
// setValue, called on the main thread
getCurrentName().value = "test"

// postValue, called on the other thread
getCurrentName().postValue("test")
如何使用
见ViewModel
Room
概念
官方定义:
The Room persistence library provides an abstraction layer over SQLite to allow fluent database access while harnessing the full power of SQLite.
The library helps you create a cache of your app’s data on a device that’s running your app. This cache, which serves as your app’s single source of truth, allows users to view a consistent copy of key information within your app, regardless of whether users have an internet connection.
Room 数据持久框架 可以直接返回LiveData类型的数据。当数据库对应数据发生更新之后,会直接通知回调回来,无需重新请求数据库,十分方便。
Room框架主要有:
Dao+Entity+RoomDatabase三部分组成。代码
Entity1 2 3 4
@Entity(tableName = "demotable") data class DemoEntity(@PrimaryKey var id: Long, var name: String, var address: String)
Dao1 2 3 4 5 6 7 8 9 10 11 12 13 14 15 16
@Dao interface DemoDao { @Query("SELECT * FROM demotable") fun loadAllProducts(): LiveData<List<DemoEntity>> @Insert(onConflict = OnConflictStrategy.REPLACE) fun insertAll(products: List<DemoEntity>) @Query("select * from demotable where id = :id") fun loadProduct(id: Int): LiveData<DemoEntity> @Query("select * from demotable where id = :id") fun loadProductSync(id: Int): DemoEntity }
Database1 2 3 4 5 6 7 8 9 10 11 12 13 14 15 16 17 18 19
@Database(entities = [(DemoEntity::class)], version = 1) abstract class DemoRoomDatabase: RoomDatabase() { abstract fun demoDao(): DemoDao companion object { private var instance: DemoRoomDatabase? = null fun getDatabase(context: Context):DemoRoomDatabase { if (instance == null) { synchronized(DemoRoomDatabase::class.java, { if (instance == null) { instance = Room.databaseBuilder(context.applicationContext, DemoRoomDatabase::class.java, "my database name").build() } }) } return instance!! } } }
database upgrade
1
2
3
4
5
6
7
8
9
10
11
12
13
14
15
16
17
18
19
20
21
22
//递增版本号
@Database(entities = [(DemoEntity::class)], version = 2)

//若没有设置migration, 则必须调用fallbackToDestructiveMigration。此时,数据将会被清空
Room.databaseBuilder(context.applicationContext, DemoRoomDatabase::class.java,
                     "my database name")
    .fallbackToDestructiveMigration()
    .build()

//设置migration
val MIGRATION_1_2 = object: Migration(1, 2) {
    override fun migrate(database: SupportSQLiteDatabase) {
        //...
    }
}
Room.databaseBuilder(context.applicationContext, DemoRoomDatabase::class.java,
                     "my database name")
    .addMigrations(MIGRATION_1_2)
    .build()

//如果当前版本是4,为了兼容之前的版本
	.addMigrations(MIGRATION_1_2, MIGRATION_2_3, MIGRATION_3_4)
如何使用
1
2
3
def room_version = "1.1.0" // or, for latest rc, use "1.1.1-rc1"
implementation "android.arch.persistence.room:runtime:$room_version"
annotationProcessor "android.arch.persistence.room:compiler:$room_version"
在kotlin中使用:
a. 将annotationProcessor更换成kapt
b. 引入插件 ‘ kotlin-kapt ’
1
2
3
4
5
apply plugin: 'kotlin-kapt'
...
kapt {
    generateStubs = true
}
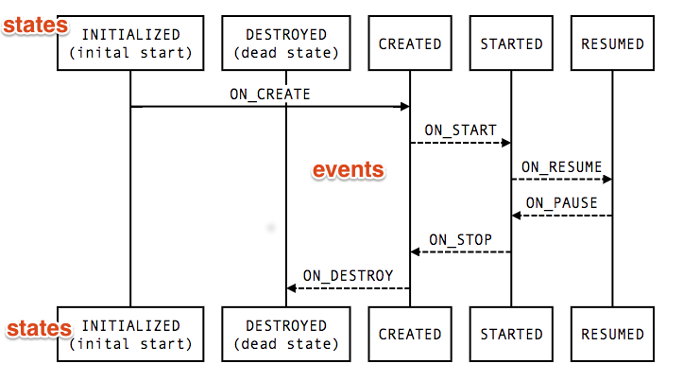
LifeCycle
示意图
简单代码
1
2
3
4
5
6
7
8
9
10
11
12
13
public class MyObserver implements LifecycleObserver {
    @OnLifecycleEvent(Lifecycle.Event.ON_RESUME)
    public void connectListener() {
        ...
    }

    @OnLifecycleEvent(Lifecycle.Event.ON_PAUSE)
    public void disconnectListener() {
        ...
    }
}

myLifecycleOwner.getLifecycle().addObserver(new MyObserver());
如何使用
1
2
3
def lifecycle_version = "1.1.1"
//LifeCycler
implementation "android.arch.lifecycle:runtime:$lifecycle_version"
WorkManager
介绍:
WorkManager能够帮助我们在适合的时间点处理异步的、可推迟的任务。例如,我们创建一个下载任务,并指定下载条件:仅在设备在充电且有网的状态下,将任务交给WorkManager之后, 它会在适当的时间点帮助我们进行下载。即使App应用已经强制退出了或者手机重启过,该任务都能够保住运行。
如果WorkManager在处理任务时,APP恰好在运行中,那WorkManager会在当前APP进程中创建一个新的线程处理该任务。如果此时APP并未运行,WorkManager会选择一个合适的方式,如
JobScheduler, Firebase JobDispatcher, orAlarmManager等。作为开发者,并不要关心WorkManager选用哪种方式,把一切都交给WorkManager就好了。
代码:
创建任务
1
2
3
4
5
6
7
8
9
10
11
12
13
14
15
16
17
18
class CompressWorker : Worker()  {

    override fun doWork(): Result {

        // Do the work here--in this case, compress the stored images.
        // In this example no parameters are passed; the task is
        // assumed to be "compress the whole library."
        myCompress()

        // Indicate success or failure with your return value:
        return Result.SUCCESS

        // (Returning RETRY tells WorkManager to try this task again
        // later; FAILURE says not to try again.)

    }

}
交给WorkManager:
1
2
val compressionWork = OneTimeWorkRequestBuilder<CompressWorker>().build()
WorkManager.getInstance().enqueue(compressionWork)
设置一些运行条件(如果不设置,一般会立刻运行):
1
2
3
4
5
6
7
8
9
10
11
// Create a Constraints that defines when the task should run
val myConstraints = Constraints.Builder()
        .setRequiresDeviceIdle(true)
        .setRequiresCharging(true)
        // Many other constraints are available, see the
        // Constraints.Builder reference
        .build()

val compressionWork = OneTimeWorkRequestBuilder<CompressWorker>()
        .setConstraints(myConstraints)
        .build()
取消任务:
1
2
val compressionWorkId:UUID = compressionWork.getId()
WorkManager.getInstance().cancelWorkById(compressionWorkId)
监听任务状态:
1
2
3
4
5
6
7
WorkManager.getInstance().getStatusById(compressionWork.id)
                .observe(lifecycleOwner, Observer { workStatus ->
                    // Do something with the status
                    if (workStatus != null && workStatus.state.isFinished) {
                        // ...
                    }
                })
创建周期性的任务:
1
2
3
4
5
6
7
8
val photoCheckBuilder =
        PeriodicWorkRequestBuilder<PhotoCheckWorker>(12, TimeUnit.HOURS)
// ...if you want, you can apply constraints to the builder here...

// Create the actual work object:
val photoCheckWork = photoCheckBuilder.build()
// Then enqueue the recurring task:
WorkManager.getInstance().enqueue(photoCheckWork)
WorkManager还支持链式任务, 但一旦其中的某个任务失败,整个任务链就会中断结束:
1
2
3
4
5
6
7
8
9
10
11
12
13
14
15
16
17
18
19
20
WorkManager.getInstance()
    .beginWith(workA)
        // Note: WorkManager.beginWith() returns a
        // WorkContinuation object; the following calls are
        // to WorkContinuation methods
    .then(workB)    // FYI, then() returns a new WorkContinuation instance
    .then(workC)
    .enqueue()


val chain1 = WorkManager.getInstance()
    .beginWith(workA)
    .then(workB)
val chain2 = WorkManager.getInstance()
    .beginWith(workC)
    .then(workD)
val chain3 = WorkContinuation
    .combine(chain1, chain2)
    .then(workE)
chain3.enqueue()
从任务中获取结果内容:
1
2
3
4
5
6
7
8
9
10
11
12
13
14
15
16
17
18
19
20
21
22
23
24
25
26
27
28
29
30
31
32
33
34
35
36
37
38
39
40
41
42
43
44
45
46
47
48
// Define the parameter keys:
const val KEY_X_ARG = "X"
const val KEY_Y_ARG = "Y"
const val KEY_Z_ARG = "Z"

// ...and the result key:
const val KEY_RESULT = "result"

// Define the Worker class:
class MathWorker : Worker()  {

    override fun doWork(): Result {
        val x = inputData.getInt(KEY_X_ARG, 0)
        val y = inputData.getInt(KEY_Y_ARG, 0)
        val z = inputData.getInt(KEY_Z_ARG, 0)

        // ...do the math...
        val result = myCrazyMathFunction(x, y, z);

        //...set the output, and we're done!
        val output: Data = mapOf(KEY_RESULT to result).toWorkData()
        setOutputData(output)

        return Result.SUCCESS
    }
}

//通过setInputData设置参数
val myData: Data = mapOf("KEY_X_ARG" to 42,
                       "KEY_Y_ARG" to 421,
                       "KEY_Z_ARG" to 8675309)
                     .toWorkData()

// ...then create and enqueue a OneTimeWorkRequest that uses those arguments
val mathWork = OneTimeWorkRequestBuilder<MathWorker>()
        .setInputData(myData)
        .build()
WorkManager.getInstance().enqueue(mathWork)

//通过status.outputData获取结果
WorkManager.getInstance().getStatusById(mathWork.id)
        .observe(this, Observer { status ->
            if (status != null && status.state.isFinished) {
                val myResult = status.outputData.getInt(KEY_RESULT,
                      myDefaultValue)
                // ... do something with the result ...
            }
        })
如何使用:
Dagger 2
概念
Dagger2 是Google维护的一个依赖注入的框架。通过@Inject、@Component、@Module、@Provides、@Scope等注解实现类的注入。它的机制是在编译期根据注解生产相应代码,而非通过运行时反射,因此也不会有性能上的影响。
@Inject: 依赖注入的变量 以及 被注入的类构造方法 中用到
@Module/@Provides: 提供注入实例的类
@Component: 关联 注入类 和 被注入类 的必要类
@Scope: 实例的作用域范围
代码示例
被注入的类 + Component + 需要注入的类
被注入的类
1
2
3
4
5
class InjectObject @Inject constructor() {
    init {
        Log.d("InjectObject", "instant InjectObject")
    }
}
构造方法需要被
@Inject注解Component
1
2
3
4
@Component
interface DemoActivityComponent {
    fun inject(activity: DemoActivity)
}
方法inject 的入参必须严格是
需要注入的类,不能是它的父类。需要注入的类
1
2
3
4
5
6
7
8
9
10
11
class DemoActivity: AppCompatActivity() {
    @Inject
    lateinit var injectObject: InjectObject

    override fun onCreate(savedInstanceState: Bundle?) {
        super.onCreate(savedInstanceState)
        DaggerDemoActivityComponent.create().inject(this)
        setContentView(R.layout.activity_main)
    }
]
}
a. 被注入的变量需要被
@Inject注解b. 调用
DaggerDemoActivityComponent.create().inject(this)开始注入c. 类
DaggerDemoActivityComponent会在编译时自动生产Module + Component + 需要注解的类
Module 类
1
2
3
4
5
@Module
class DemoModule {
    @Provides
    fun getObject(): InjectObject = InjectObject()
}
a. 类需要被
@Module注解b. 方法中需要有一个返回
被注解的类的方法, 并且被@Module注解c. 若
@Provides 方法与@Inject构造方法均存在, 优先使用第一个, 在找不到方法的情况下会去查找@Inject构造方法的类d. 若
@Provides 方法需要入参,Dagger2 会在该Module中自动查找返回该入参的其他@Provides 方法。Component 修改一下
1
2
3
4
@Component(modules = [(DemoModule::class)])
interface DemoActivityComponent {
    fun inject(activity: DemoActivity)
}
a. @Component 关联Module 类
b. Component 除了可以扩展Module外, 还能dependencies Component。相当于继承,在dependencies之后, Component 便拥有了原来的功能。
Scope概念。借助
@Singleton实现局部或全局单例Module类中方法增加
@Singleton注解1 2 3 4 5 6
@Module class DemoModule { @Singleton @Provides fun getObject(): InjectObject = InjectObject() }
Component 增加
@Singleton注解1 2 3 4 5
@Singleton @Component(modules = [(DemoModule::class)]) interface DemoActivityComponent { fun inject(activity: DemoActivity) }
a.
DaggerDemoActivityComponent.create()产生的Component实例不是单例b. 同一个Component 多次调用inject 注入的实例是单例
c.
@Singleton是@Scope的一个子类, 可以自定义其他scope子类, 代表不同功能, 如: @ApplicationScope 、 @ActivityScope
使用
1
2
3
 //加入依赖
 implementation 'com.google.dagger:dagger:2.16'
 annotationProcessor 'com.google.dagger:dagger-compiler:2.16'
在kotlin中使用:
a. 将annotationProcessor更换成kapt
b. 引入插件 ‘ kotlin-kapt ’
1
2
3
4
5
apply plugin: 'kotlin-kapt'
...
kapt {
    generateStubs = true
}